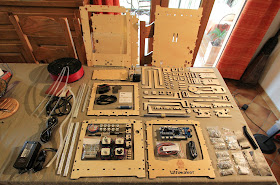
The Ultimaker I bought proved to be a (nice) clone !
I bought what was abusively called an Ultimaker on eBay on March, 2012.
In fact the printer I got was an illegal clone of the "real" Ultimaker, made by a Chinese guy and sold on eBay, that he later renamed to a blue-painted clone name before he went out of business.
Still, there where a few differences with the original printer (mostly the head). So this post about my printer may help re-injected some tips into the open hardware community. Moreover, he does not seem to be selling printers anymore, so I will probably not harm the real and only Ultimaker you should buy ! Seriously, do not come and ask for support from the "good guys" if ever you bought a clone, this is not fair at all. I am far from certain that you would get support with low-cost clones so you would better go with something reliable in the first place.
To make it clear: even though the seller proved to be reliable, talkative and he did know his stuff, I suggest you read the related ultimaker forum discussion. Until then I did not fully realized that "open hardware" does not mean you could legally reuse brand names like this !
The pity was that the official Ultimaker shop delivery was both very slow and quite expensive at the time. So I went the risky eBay way, as I really wanted one in less than 3-6 weeks. This seems to be a constant for all of the 3D printer companies though, not speaking about big ones of course.
Warning for French customers though : I did pay a lot for the customs (hey for once, it was not labelled as a gift!). This resulted in the same overall price I would have had with the official UM in the end (less a few nice changes). Anyhow the price was not my motivation in the first place, and I was prepared not to get any support (which I still got though).
Initial specifications as advertised (and checked!)
- 4 quiet, but strong stepper motors (NEMA 17 standard) with A4988 Pololu based StepStick stepper driver
- Assembled printhead including (Cutom machined 0.4mm nozzle, thermocouple, heater-cartridge heats within 2minutes, thermocuple PCB).
- Bowden cable (PFA, more robust than PTFE)
- 3M/Scotch Blue tape
- 3mm thick PLA filament (1kg - random color)
- Power: 110V-240V operation, 50-60Hz - 120W - 19V output.
As said: "The print head design uses a special ceramic heater cartridge, which is reliable, durable and heats within 2minutes. The design does not use nichrome-wire. The entire come assembled. Also, it uses a glass filled injection moulded PEEK thermal barrier, that is more stable at high temperatures.". In case it is useful to the community...
Reliability proved true by the way. I also was sent another spare PEEK + aluminium heating block + aluminium plate, that I never had to use yet. As the peek is already locked/made into its hole, I cannot not use it as a secondary nozzle. It would have been cool.
The "random" filament color proved to be an awful pink. And I got heavy spool of it...
Strangely this color turns quite differently on pictures according to the ambient light. I suspect it has a special wavelength that the camera does not process correctly. The filament is of good quality and the spool itself is a sturdy piece of clipped plastic that I will reuse for sure (just the diameter was not the standard UM one). Shortly after, the seller switched to another kind of filament in his eBay shop, with metal/cardboard spool that features a colored 3Dfabster logo. I suspect he either sells them the filament, or this is another copyright infringement. Though the plastic is still very good, I will switch to another closer, more regular, European seller.
Assembly

Most of the printer, including the logo came from the standard laser cut definition, so I could follow the official ultimaker wiki (a bit of a shame considering the work that was done there!).
I recorded a timelapse video of my assembly of the printer. It took me about 10 hours, even though I consider myself an amateur and enthusiast craftsman. I then spent another 15-30 hours to make it print correctly.
This is long but it was not unexpected. And I took my time so I could do it nicely. Nice experience in any case.
No comments:
Post a Comment